schema.org is a mechanism for explicitly annotating site content so that search engines can better understand what your website contains. Applying it to your site improves its search rank results improving its discoverability.
Bookmark this page
Bookmarked
Adding schema.org to a GitHub Pages site
Estimated read time: 9 min
Sections in this article
Adding schema.org to a GitHub Pages site
 I
I
mage by Michael Coghlan. Available on Flickr.
By Niall Beard, University of Manchester.
schema.org is a mechanism for explicitly annotating site content so that search engines can better understand what your website contains. Applying it to your site improves its search rank results improving its discoverability.
Why?
As with any site nowadays; you’re competing in a crowded market-place. Ranking higher on search result pages or being included in 3rd party registries that receive more web-traffic can raise the exposure of your work to be seen by larger audiences. This is all achievable by following best practices and applying schema.org to your site.
It doesn’t matter what your website has on it - biological datasets, training resources, software tools, film stars - describing them using schema.org will enhance your sites presence in search engine results, and it will allow your site to be indexed in aggregated registries (such as ELIXIR TeSS for training, or bio.tools for tools and databases).
What?
Schema.org is a collection of specifications (called vocabularies) that are used to define in a structured way what is being displayed on a web page. Search engines are in the business of understanding websites content so they can more effectively direct the searcher to their desired location. They would normally consider a page relevant to a user if words in the query match words within the document (with some fancy algorithms applied on top). Schema.org gives page owners a mechanism to explicitly define what content they have in their page, which removes the necessary guess-work from the search engines and raises their certainty that the user in fact wanted to know something contained within this page.
Organisations such as bioschemas.org also create profiles over the schema.org vocabularies to describe specialised resources using schema.org to make scientific assets more findable and interoperable.
GitHub Pages are an excellent platform for creating informative websites. The hosting is (currently) free which is a huge plus; the collaborative tools allow teams (that may be widely distributed, quickly changing, or voluntary) to contribute in a well-structured, verifiable, and open manner; and the version control capabilities are incredibly useful throughout development. It’s becoming a popular choice to make websites with.
How?
This guide will show you how to do add schema.org to GitHub Pages.
Schema.org can be applied to any online page made using any tech-stack but due to Jekyll (the underlying tech being Github pages) being a very clear, simple, and increasingly popular framework; this tutorial follows the process using Github pages.
If you do not already have a website, you can follow this guide about setting up a GitHub Page to configure the correct development environment and set one up.
For this example we’ll add schema.org to a Training Materials site.
To follow along; set up a new jekyll app by running jekyll new my-tutorial and matching the file structure below.
Create a new folder called tutorials which will contain your training materials. Create a new folder called _layouts which will contain a template page structure.
├── 404.html ├── Gemfile ├── Gemfile.lock ├── _config.yml ├── _layouts │ └── tutorial.html ├── _tutorials │ └── awesome-tutorial.md ├── about.md └── index.md
Lets create our first tutorial called awesome-tutorial.md in tutorials. In each of our tutorials, we’ll define the content of the page in Markdown syntax at the bottom of the file, and add all the metadata describing it above.
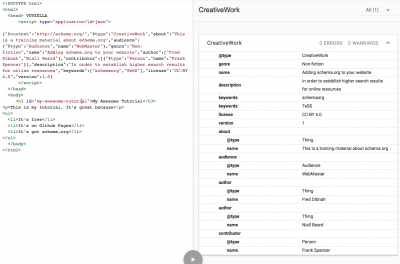
Open awesome-tutorial.md and add the metadata. Jekyll allows you to put metadata at the top of markdown files in YAML syntax. This metadata must be surrounded by 3-hyphens above and below.
--- layout: tutorial schemadotorg: "@context": http://schema.org/ "@type": CreativeWork about: "This is a training material about schema.org" audience: - "@type": Audience name: WebMaster genre: "Tutorial" name: "Adding schema.org to your website" author: ["Fred Dibnah", "Niall Beard"] contributor: - "@type": Person name: "Frank Spencer" description: "In order to establish higher search results for online resources" keywords: ["schemaorg", "TeSS"] license: CC-BY 4.0 version: 1.0 --- ### My Awesome Tutorial This is my tutorial. It's great because - It's free - It's on Github Pages - It's got schema.org
Here we define how to render the page, what metadata to use, and what the page content should be.
The first two properties specifiy which vocabulary we are using - the CreativeWork vocabulary ("@type": CreativeWork) from schema.org ("@context": http://schema.org/).
You will use a different schema type depending on which schema.org vocabulary you are describing (e.g. "@type": Event for events, "@type": Website to describe what your website is, or "@type": Recipe to describe a potato salad)
Underneath, we have a list of key-value pairs. Each key is a property of the CreativeWork vocabulary. The full list of properties, the expected types, and examples on how to use them are all available on vocabulary pages in http://schema.org.
We’ve also added layout: tutorial to our YAML. This tells Jekyll (the underlying framework) that this page should be rendered inside the HTML template tutorial.
We created a new folder called _layouts and have a new empty file called tutorial.html inside. This is where our template will be. Open tutorial.html and add the following:
<!DOCTYPE html> <html> <head> <script type="application/ld+json"> {{ page.schemadotorg | jsonify }} </script> </head> <body> {{ content }} </body> </html>
This will be the basic layout of on any page that specifies layout: tutorial in its YAML. The content unique to each page will be injected where the {{ content }} tag is. This is where our Markdown from earlier will be rendered into HTML.
To render our schema.org we pass the schemaorg metadata to a function called jsonify. This will convert our YAML metadata into JSON-LD - which will form our completed schema.org annotation!
This function first needs to be installed. Open the file Gemfile in the root directory and add the following lines:
source "https://rubygems.org" gem "jekyll", "~> 3.7.3" group :jekyll_plugins do gem "jekyll-json-ld" end
Perfect! Now run bundle install to install the jekyll-json-ld gem. (see step 2.5) Then, start the Jekyll server with jekyll serve and navigate to 127.0.0.1:4000/tutorials/awesome-tutorial.html in your browser (see step 4).
Testing
On your tutorial page, right click and view the page source.
If all is well, you should see schema.org JSON-LD data inside the HTML. To test whether this is formatted correctly, you can then go to Google structured data testing tool and copy the HTML in.
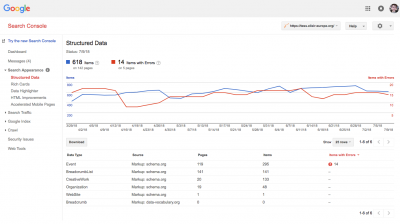
Once you have created a website that is publicly available online and has correctly formatted JSON-LD, you can go to the Google Search Console and see more statistics about what and how Google interprets the data on your site.
In the Search Console you can request re-indexing when your schema.org is setup, view the error rates, and see how people are finding and using your site.
Making better use of the metadata
If you change anything about your training material, you would have to change both the material and the metadata. But one of the advantages of structuring data into a machine readable format is data becomes very accessible and re-usable.
So instead of duplicating information, we should use the metadata to form the view that website users see. Go back to _layouts/tutorial.html and add some more template code to render the metadata variables within the HTML.
<!DOCTYPE html> <html> <head> <script type="application/ld+json"> {{ page.schemaorg | jsonify }} </script> </head> <body> <h1>{{ page.schemaorg.name }}</h1> by {{ page.schemaorg.author | join: ' and ' }}<br> <i>{{ page.schemaorg.about }} </i><br> This tutorial is aimed at: {{page.schemaorg.audience.first.name}} {{ content }} </body> </html>2